by Sean B.
What is Service Host SuperFetch and How to Disable It in 2023 - Does the task manager of the Windows 10 PC you own report that its service host local system is taking up the bulk of the memory? You are not alone! Most users of Windows 10 have the same complaint. When Microsoft released the Windows 10 in 2015, they most likely did so with good intentions. The proof of this is in the upgraded features it has. There is an upgrade in the user interface as well. Users can alternate between two interfaces or modes as well. The first is an interface mode designed for the keyboard and mouse. The second, optimized for touchscreens is the “tablet mode”. Windows 10 was much of a successful attempt to improve on the previous Windows versions. In spite of this, it is a known fact that there are some underlying glitch causing features.
As expected, these features affect the PC’s performance to a large extent. Superfetch happens to be one of such as it causes the high memory usage many Windows 10 users complain about. Yet, the feature is not peculiar to Windows 10 alone. It was at first introduced in the Windows Vista to succeed the PreFetch in Windows XP.
Ever come across a notification along the lines –
“Your PC is experiencing a problem it can’t handle and the disk usage is almost 100% due to Service Host: Local System”?
The culprit is Superfetch. That notification comes on because in the system’s Task Manager, the Superfetch feature takes up the larger part of the PC’s storage.
If you’ve ever come across such notification and you are looking to get it fixed, this post is for you. Before the problem can get fixed, the source of the problem has to be well understood. Read on to find out everything there is to be aware of when it comes to Superfetch.
Contents
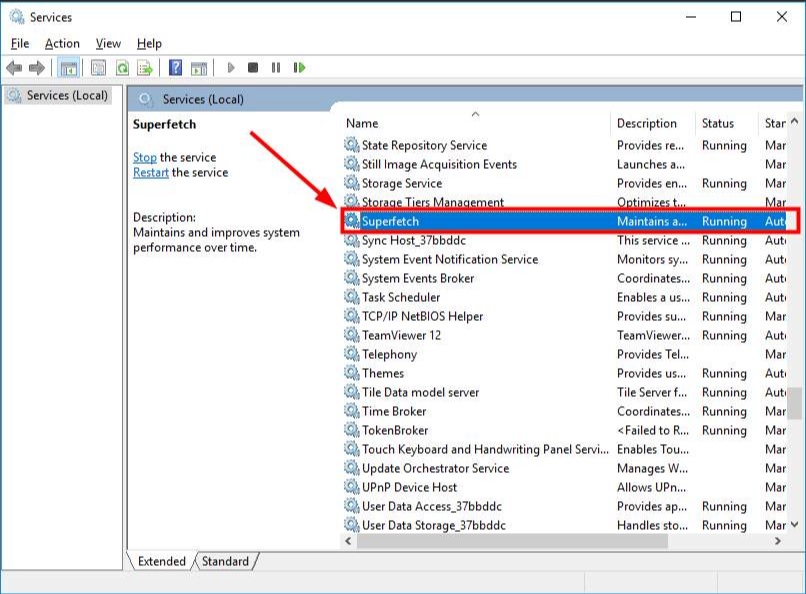
Think of Service Host SuperFetch as the molecular memory of the computer. It analyzes the usage patterns of a PC over a period of time in a bid to optimize its memory content. In the simplest terms, here’s what Superfetch does. As you make use of your PC, Superfetch takes note of what apps you use the most. It then loads the components of these apps into the RAM of the PC. Hence, when you use them, the apps load quicker than they usually would have. This way, third-party apps, and some Windows components get to perform their tasks in good time.
For Superfetch to function, the PC will have to put together data from each app and program. It makes use of an algorithm to do this for the apps and programs. Of key note is the fact that it gathers this data for often used apps. Case in point, if you often use the word document program, Superfetch gets to access its data due to this. When you then close it, Superfetch goes to the main storage of the system to collect the program’s memory. This way, the operation of that program will not have to start from the system’s disk when next you open it. This is because its cache data already exists.
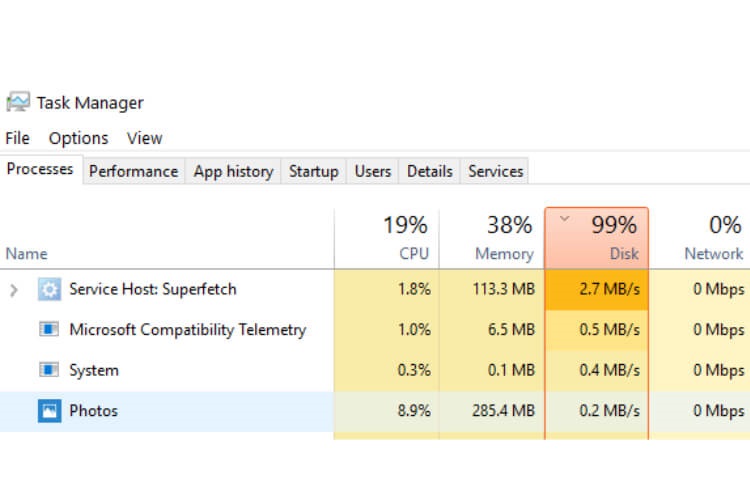
Yes, what Superfetch does sounds pretty interesting and useful. Everyone appreciates a feature that helps them to save time. The catch, unfortunately, is that there is always a price to pay. With Superfetch, the price is the disk usage of the system. For a feature of this nature to operate well, a huge size of RAM has to get sacrificed. Also, it keeps running behind the scenes causing it to use up some of the system’s resources such as the RAM.
The heavy memory usage is not the single reason this service host is a pain in the neck. In some cases, the PC’s service host tends to be unaware of when it ought to stop or even what app or program it ought to load in advance. As if that does not cause enough damage, Superfetch is capable of running every program at once. This is the reason for the low booting process many Windows 10 users complain about.
Gamers who make use of their Windows 10 system to play game have reported another Superfetch con. They claim that it brings down their frame rates thereby affecting their gaming fun. Some other users also complain that Superfetch process causes there to be memory spikes. This spike then goes on to cause the system to freeze up.

So far, this article has discussed the pros and cons of the Superfetch process. There are two questions now. Are its benefit strong enough to make its cons negligible? If it isn’t and one decides to disable it, are there any consequences? While the former question is relative and depends on individual choice, the latter isn’t.
There are many processes that cause faults when they get disabled but Superfetch isn’t included. There are no consequences whatsoever as Superfetch is only for memory management. When this disablement gets done, the system now has to run all apps and programs by itself. The only noticeable changes might be the lag in the period it takes to boot and some little bugs. Apps and programs might also begin to respond slower when opened. These are only minute issues in the big picture of a 100% disk usage. Thus, it pays if one disables Superfetch as the full disk would cause booting time to keep increasing. With Superfetch gone, booting time gets reduced to the barest minimum.
There has been no report of users experiencing significant changes after disabling Superfetch. Yet, the recommendation is that users should disable with due diligence. Hence if there are no desired results after disablement, it is advisable to enable it by turning it back on. It is important to note that in some cases, disabling Superfetch is only the beginning. It is one of the many steps that some users need to put a total end to a 100% disk usage on their Windows 10 PCs.
Everything that users need to know about Superfetch has gotten covered. What one needs to understand next is how Superfetch can get disabled. That is the major step to take in doing away with high memory usage in Windows 10.
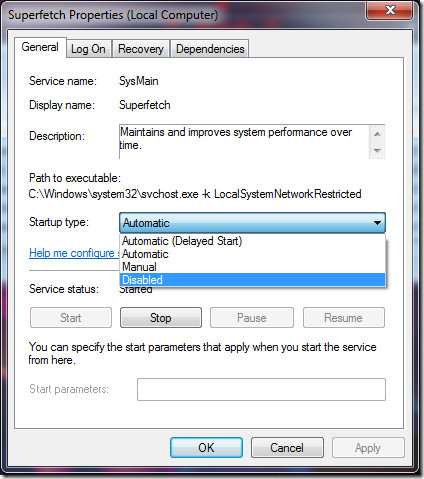
Disabling Superfetch does not demand a background in the tech industry. The Superfetch service host can get located through simple steps on the PC’s service system. Steps to follow to disable Superfetch are
- Click the “start” option
- Enter “services” into the search box
- Click “enter”
- A list of services would pop up. Search for the Superfetch option on the option’s list
- Once you’ve located it, do a right-click on it
- From the list of options, select “properties”
- Choose the type of startup you want to disable
- Select the “stop” option to disable the service
- Click OK to confirm your choice
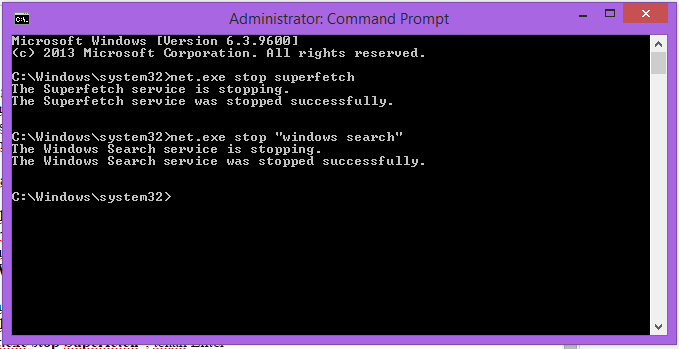
The command prompt is another easy method which when followed would disable Superfetch. To use the method, follow the steps below
· Click on the start button and locate “Command prompt”.
· Right-click it and then select the “run as administrator” option.
· Select “Yes” to continue
· Type in this command: “net.exe stop Superfetch” and then press the keyboard’s enter key
· Type in and enter “sc config sysmain start=disabled” to complete the disabling process
· Check for changes in the computer’s performance.
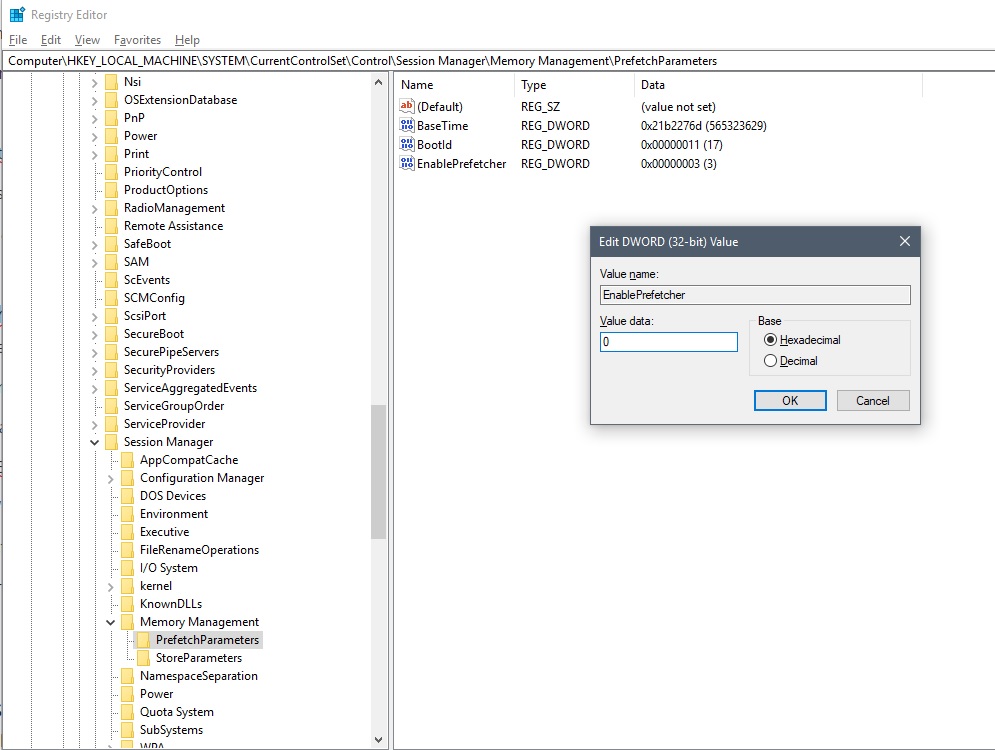
If you would rather go through the Windows registry, then you are in luck. The steps to take are to,
· Enter the phrase “Registry Editor” into the Windows search box
· Select the registry window in the result list that comes out
· Find the search box. Type in the address “HKEY_LOCAL_MACHINE / SYSTEM / CurrentControlSet / Control / SessionManager / MemoryManagement / PrefetchParameters”
· Locate and double-click the option that says “Enable Superfetch”
· Replace the value of ‘1’ with ‘0’ and then select OK
· You can then do away with the registry editor
· Switch the PC on and off
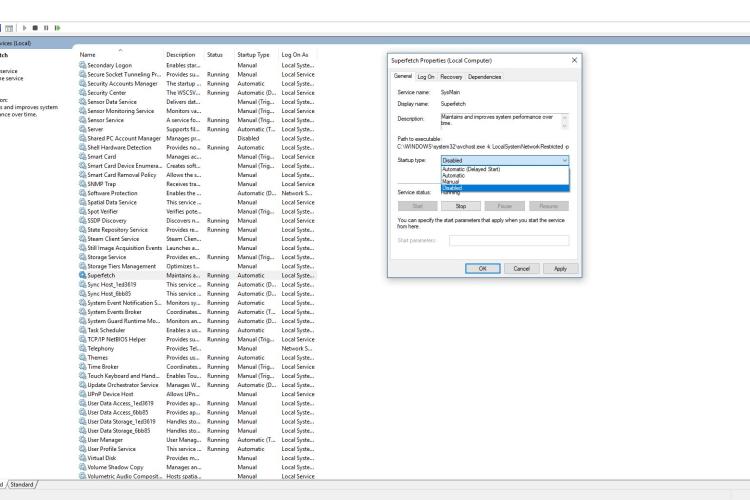
The last but by no means the least method is the Services Snap-In method. With this method, the end goal of disabling Superfetch gets achieved in only four steps
- In the Windows search box, type “Services” and click on it
- Locate the “Superfetch” service and then double-click it.
- From the list of Superfetch properties, select “Disabled”
- Click on the option that says “Stop” and restart the PC
For any of the methods carried out, you’d find that when you go to your task manager, it would report normal disk usage.
While the Superfetch process fixes some problems, it could also cause much more than it fixes. This is why disabling is always an option. The four methods above are all tested and trusted methods you can use to disable Superfetch on your PC. Choose any of the methods that works for you and go on to enjoy a PC with a noal disk usage.

About Sean B.
Sean Bradley is a highly regarded marketing expert with extensive experience and expertise in the field. With a passion for helping businesses thrive and grow, Sean has established himself as a leading figure in the marketing industry. Sean's expertise spans various marketing channels, including digital marketing, social media marketing, search engine optimization (SEO), content marketing, and branding. He is well-versed in utilizing data-driven insights to craft targeted marketing strategies that resonate with audiences and generate measurable ROI.
 |
 |
 |
 |
Recent Post
Let's try FREE Giveaways. Or go to Free Gifts page
Update AdBlock to see the secrets. Hit a button below for update
 |
 |
 |
 |